For the uninitiated, guitar setup can seem intimidating. We all understand intuitively that the lower your action is the easier your guitar is going to play, but how to actually achieve a nice low action is the tricky part. Today I’ve decided to talk about the truss rod which is the aspect of guitar setup that seems to cause the most confusion to new players. We’re going to find out what it’s for, how it works and how you can adjust it at home and save yourself a trip to the local guitar tech.
First things first... what is neck relief?
No guitar neck is perfectly flat. Because of the arch that strings make when they vibrate, guitar necks are designed to have a slight bow to them so that they don’t buzz against other frets when you’re playing a note. This bow is called neck relief. If, hypothetically, the neck was completely flat you would end up with buzzing frets, especially on the first 4 of 5 frets of your guitar.
What does a truss rod do?
Originally, acoustic guitars were all strung with gut strings. Gut strings don’t apply a lot of tension to the neck so luthiers were able to compensate for their tension by using the right size wooden neck with no reinforcement.. However, starting in the first half of the 20th century, steel strings became the industry standard, meaning that guitar necks now had 100-200lbs of force pulling on their necks. This left luthiers of the time with two options. They could either drastically increase the size of the guitars neck in order to compensate for this added tension or they could figure out a way to reinforce their current necks without dramatically changing the size or feel of them. Lucky for us they chose the latter and they began using the truss rod on American acoustic guitars.
A modern guitar truss rod a typically an adjustable steel rod that runs the length of a guitar’s neck underneath the fretboard. The purpose of the truss rod is to stabilize the neck against the forces put on it by the strings.These truss rods are threaded and can be tightened or loosened to provide more or less tension on the neck, allowing the player to adjust how much relief their guitar’s neck has.
Measuring and adjusting
Now that we know what a truss rod and neck relief are, we can talk about how to measure it on your own guitar and how to adjust it if necessary.
To do this we’re going to need:
- A guitar capo (or maybe a friend to offer a hand)
- A truss rod tool or a set of metric allen wrenches
- An engineering ruler
- A small phillips head screwdriver (maybe)
Measuring your neck relief is a pretty simple. Lie your guitar down on a table and place a capo on the 1st fret. Then, with one hand, hold the fret on the low E string at the 12th fret. Now, looking at the edge of the fretboard, measure the distance between the bottom of the low E string and the top of the 7th fret. The gap should be about 0.010” and 0.020”. For those of you who don’t have an engineering ruler handy, you can estimate it and in terms of the thickness of a credit card. A credit card is 0.030” so if you’re gap is about half of the thickness of a card you’ll be right in the middle of the recommended range. If the relief is any more than 0.020” you’ll probably want to tighten the truss rod a bit and if it’s any less you’ll probably want to loosen it.
The reason the action is given as a range rather than one definitive answer is because, like everything else with guitars, the “right” action is always subjective. Here it comes down to how heavy of a hand you have when you play. If you’re a soft strummer or fingerpicker you’ll probably want to aim for the 0.010” side of the range (Or maybe even a tiny bit less). If on the other hand you’re like me and have a heavier hand you’ll probably end up needing to go for 0.020”. The name of the game is to get as little neck relief as possible without buzzing for your playing style so feel free to experiment a bit.
Once you’ve measured and saw where your neck relief is you can adjust it. First, we have to locate the truss rod nut on our guitar. If you’re working on an electric guitar the truss rod nut is normally found at the headstock of the instrument in a recessed channel or possibly underneath a plastic cover on the headstock (Removing this cover is what you may need the small Phillips Head screwdriver for). On acoustic guitars the nut is generally found inside of the soundhole, recessed in a hole. The depth of this hole varies between manufacturers. Blueridge guitars have a shallow hole, and can be adjusted with a 4mm Allen wrench. Martins, on the other hand, are much deeper, necessitating a “Truss rod tool” that is long enough to reach the more recessed nut. A 5mm wrench is necessary for Martin Guitars.
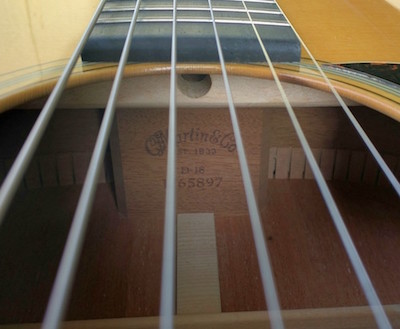
A picture of the truss rod hole in my Martin D-18. Most acoustic guitars will have the truss rod in basically this same location.
Once you have found the truss rod nut, you’ll need to find an allen wrench that fits it. If a wrench was supplied with your guitar when you bought it, use that. If you weren’t given a wrench or have lost it, try take out a set of allen wrenches to try to find the right size. Remember though, you want the closest fit possible. If one wrench seems to fit but still has some play try the next size up. Using too small of a wrench means you risk having it slip as you’re adjusting and possibly stripping the truss rod nut. A quick tip is that most modern manufacturers use truss rods that take a 5mm or 6mm wrench.
Before we adjust, it’s important to understand exactly what tightening or loosening the truss rod will do. If we tighten the truss rod (turning it clockwise) we’re adding tension and the rod will pull back more, decreasing the bow and lowering the neck’s relief. Loosening the truss rod (turning it counterclockwise) decreases tension and increases the neck’s relief.
When you’re adjusting the truss rod, GO SLOW. When I’m doing these adjustments either here at Maury’s Music or at home with my own instruments I tend to play it safe and only tighten or loosen by 1/4 - 1/2 of a turn per day at most. I’ll give it the quarter turn, see where I’m at and then let the neck settle. The next day I’ll check the relief again and repeat as necessary. The neck needs time to settle between adjustments or you can damage your guitar if you do too much all at once.
When to adjust
Unless your instrument is being incorrectly stored (see my blog on humidity and acoustic guitars), if everything else stays the same your truss rod should need to be adjusted only once or twice per year. Personally I find that I tend to adjust my guitars twice a year, once in January or February and again in July or August. This is due to the fact that the humidity in Pennsylvania will vary greatly throughout the year and, although I’m as careful as possible when it comes to proper humidification, you’re never going to get it 100% perfect all of the time. On top of this, as your guitar ages the neck is going to require adjustment for relief even if it’s kept in absolute perfect humidity conditions. It’s just the nature of the beast.
A change in string gauge may also mean you need to adjust your neck relief. If you step up a gauge (say going from Lights to Mediums) you’ve suddenly put more tension on the neck, causing the relief to increase. In this case you’ll need to tighten your truss rod a bit to compensate for this added tension. The opposite is true if you step down a gauge (Mediums to Lights) as all of a sudden your neck is pulling too far back and the truss rod needs to be loosened to increase the relief.
When not to adjust
It’s important to mention, and I can’t stress this enough, that a truss rod is NOT for adjusting the action of your guitar. However, adjusting the truss rod will affect the action. Now I know that this may sound a little counter intuitive, but stay with me.
Although adjusting the truss rod will make a difference to the action of your guitar, think of this as more like a lucky coincidence rather than it’s intended purpose. If the neck relief is “correct” (Adequately low without being too low) but I still feel the overall action of the instrument is too high then I know I need to lower the saddle and leave the truss rod alone. At best tightening the truss rod may, ever so slightly, lower the action but chances are all it’s going to do is give me fret buzz. The truss rod should only be touched if the relief needs to change, otherwise you’ll have much better results by lowering the saddle to lower the action.
And that pretty much sums it up. While it may seem scary if you haven't done it before, truss rod adjustment is a basic skill that any guitar player should know.The best piece of advice I can give is to go slow. As long as you don't rush through the process and turn the truss rod farther than you should in one sitting it's near impossible to cause any permanent damage to your instrument.
Let us know how if you've enjoyed our article and share your truss rod experiences below!